
Refresh a Web Page Using OP Auto Clicker
There are many situations where you need a web page to keep refreshing on its own waiting for an item to come back into stock, monitoring a live auction, watching for a GP appointment slot or tracking a ticket release. Doing this manually by pressing F5 or clicking the refresh button every few seconds is tedious and easy to forget. OP Auto Clicker solves this problem by automating the click on your browser’s refresh button at whatever interval you choose, keeping the page updated continuously without any effort on your part.
This guide follows the exact five step process from the official OP Auto Clicker website, with detailed explanations at each stage so you can get your automatic page refresh set up correctly the first time.
What You Need Before You Start
Before following the steps below, make sure you have OP Auto Clicker downloaded and open on your Windows PC. The tool is a portable executable, meaning there is no installation required simply download it from the official website at opautoclicker.com and double click the file to open it. You will also need the web page you want to auto refresh open in your browser and visible on screen, as you will need to click on the refresh button during the setup process.
Step 1 – Set How Often to Refresh the Web Page
The first thing to configure is the click interval this is how frequently OP Auto Clicker will click the refresh button and reload the page. You will see four fields at the top of the interface labelled Hours, Minutes, Seconds and Milliseconds.
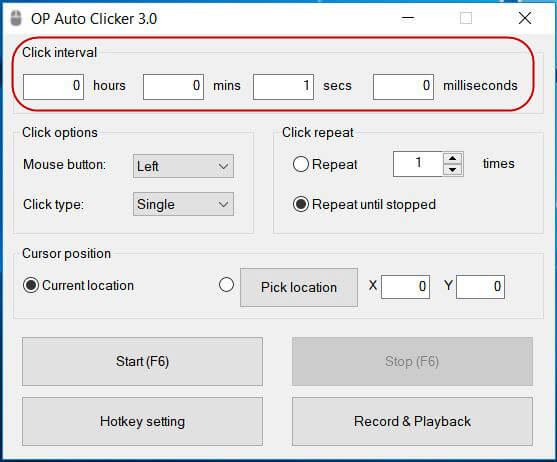
Enter the values that match how often you want the page to refresh. Here are some common examples to help you decide:
- Every 10 seconds: Set Seconds to 10, leave all other fields at 0.
- Every 30 seconds: Set Seconds to 30, leave all other fields at 0.
- Every minute: Set Minutes to 1, leave all other fields at 0.
- Every 5 minutes: Set Minutes to 5, leave all other fields at 0.
- Every 500 milliseconds (twice per second): Set Milliseconds to 500, leave all other fields at 0.
For most use cases such as stock monitoring or checking appointment availability, a refresh every 30 to 60 seconds is sufficient and considerate to the website’s server. Very frequent refreshing several times per second may cause some websites to temporarily rate limit your connection, so only use fast intervals when genuinely necessary.
Step 2 – Set the Left Mouse Button to Click the Refresh Button
Next, you need to configure which mouse button OP Auto Clicker will simulate. Since you are clicking the browser’s refresh button a standard left click action make sure the Mouse Button option is set to Left.
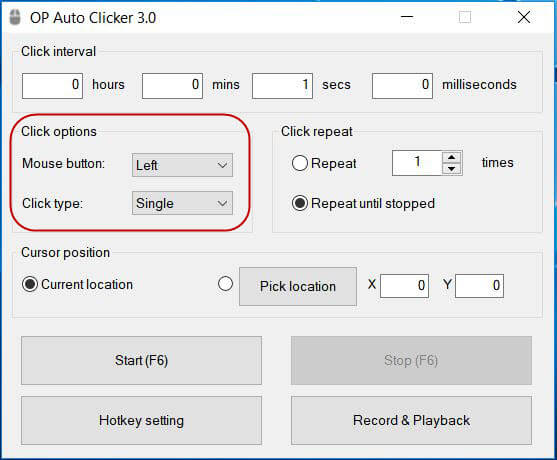
Below the mouse button selection, you will also see the Click Type option. Set this to Single click. The browser refresh button only requires a single left click to trigger a page reload, so there is no need to use double or triple click for this task.
These two settings Left mouse button and Single click are the correct configuration for all major browsers including Google Chrome, Mozilla Firefox, Microsoft Edge and Opera.
Step 3 – Set the Number of Times the Web Page Is Refreshed
Now decide how many times you want the page to be refreshed in total. In the Click Repeat section of the interface, you have two options:
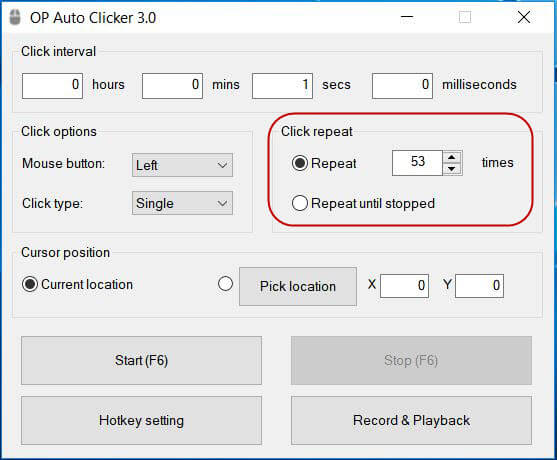
Repeat a Fixed Number of Times
If you only want the page to refresh a set number of times for example, 20 refreshes over the course of ten minutes enter that number in the repeat field. OP Auto Clicker will stop automatically once it has completed the specified number of clicks.
Repeat Until Stopped
For most auto refresh tasks, selecting Repeat until stopped is the more practical choice. This keeps the page refreshing at your chosen interval indefinitely until you manually press the Stop button or use the F6 hotkey to end the session. This is the recommended setting if you are monitoring a page over an extended period and are not sure exactly when the content you are waiting for will appear.
Step 4 – Pick the Position of the Refresh Button
This is the most important step in the setup process. You need to tell OP Auto Clicker exactly where on your screen to click in this case, the position of the refresh button in your browser. Here is how to do it correctly:
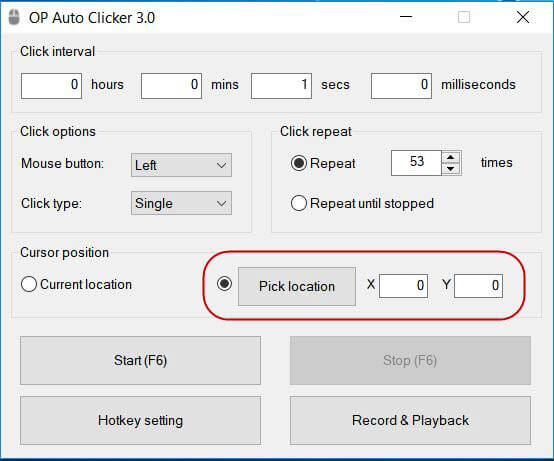
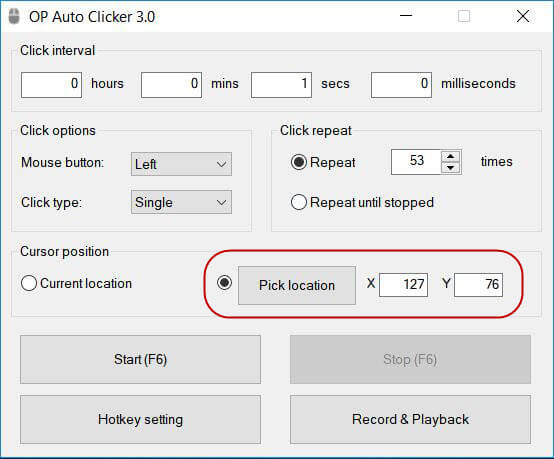
- In the Cursor Position section of OP Auto Clicker, select Pick Location. This switches the clicker from following your cursor dynamically to clicking at a fixed, saved point on your screen.
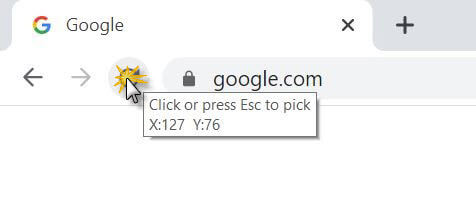
- A small crosshair or target indicator will appear. Click the Pick Location button to activate coordinate selection mode.
- Move your mouse cursor carefully over the refresh button in your browser. This is the circular arrow icon located to the left of the address bar at the top of the browser window.
- Click once on the refresh button to save its screen coordinates. OP Auto Clicker will record the exact pixel position of that point on your screen.
- The saved coordinates will appear in the interface, confirming that the position has been locked in.
It is important to complete this step before moving or resizing your browser window, as doing so afterwards will shift the refresh button to a different position on screen and the saved coordinates will no longer be accurate. If you do resize or move the window after setting the position, simply repeat Step 4 to update the saved location.
It is also worth making sure your browser window is at the correct size and position before you lock in the coordinates, so that everything is exactly where it needs to be when the auto clicking session begins.
Step 5 – Start the Automatic Refresh
With all four settings configured interval, mouse button, repeat count and cursor position you are ready to begin the automatic refresh session. You have two ways to start:
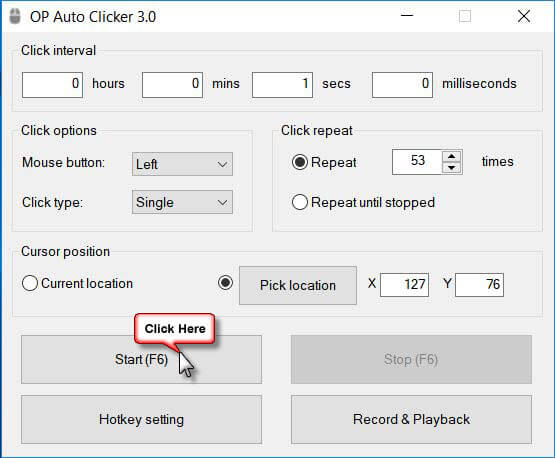
- Click the Start button inside the OP Auto Clicker interface.
- Press the F6 key on your keyboard. This is the default hotkey and works even if OP Auto Clicker is minimised in the background.
Once started, OP Auto Clicker will click the saved position at your chosen interval, reloading the web page each time. You can minimise the OP Auto Clicker window if you wish the session will continue running and the F6 hotkey will remain active so you can stop it at any time.
To stop the automatic refresh, press F6 again or click the Stop button in the OP Auto Clicker interface. If you have set a fixed number of repeats, the session will stop automatically once that number is reached.
Tips for Getting the Best Results
- Keep your browser window in the same position and size throughout the session. Moving or resizing the window after locking the coordinates will cause clicks to miss the refresh button.
- Make sure you are logged in to any website that requires authentication before starting the session, to avoid being redirected to a login page mid refresh.
- If you want to change your hotkey from the default F6 to something else, open the Hotkey Settings panel in OP Auto Clicker and assign a new key before starting the session.
- For websites that load slowly, set a longer interval to give the page time to fully load before the next refresh is triggered.
- If OP Auto Clicker is clicking in the wrong place, double check that the browser window has not moved since you saved the coordinates and repeat Step 4 if necessary.
Frequently Asked Questions
Will this work on any browser?
Yes. Because OP Auto Clicker simulates a physical mouse click on the refresh button, it works with any browser that has a visible refresh button including Google Chrome, Mozilla Firefox, Microsoft Edge, Opera and Brave. The process is the same regardless of which browser you use.
Can I keep the browser minimised while it auto refreshes?
No. If the browser window is minimised, the refresh button is no longer visible on screen and the click will land on a different area of your desktop. Keep the browser window visible and in position throughout the session for the auto refresh to work correctly.
What interval should I use to avoid being blocked by a website?
For most websites, refreshing every 30 to 60 seconds is safe and unlikely to trigger any rate limiting. Refreshing multiple times per second is not recommended as it may cause temporary blocks on some sites.
How do I stop the auto refresh quickly?
Press the F6 key on your keyboard at any time to stop the session immediately. This hotkey works even when OP Auto Clicker is running in the background, so you do not need to switch windows to stop it.
Conclusion
Setting up an automatic web page refresh with OP Auto Clicker takes just a few minutes and involves five straightforward steps: setting your refresh interval, selecting left single click, choosing how many times to refresh, picking the exact position of the browser refresh button and pressing Start. Once configured, OP Auto Clicker handles the rest, keeping your chosen page updated automatically for as long as you need. Download OP Auto Clicker for free from the official website at opautoclicker.com and set up your first auto refresh session today.