
How to Get Started Auto Tap for Android

If you want to automate repetitive tapping and clicking tasks on your Android device, OP Auto Clicker is one of the best free tools available. Known on Android as OP Auto Clicker Auto Tap, the app offers a clean, ad free interface with two powerful modes of auto clicking single target and multi targets. Whether you want to automate taps in a mobile game, speed up repetitive tasks in an app or simply reduce screen fatigue, this guide will walk you through everything from installation to your first automated tap session.
What Is OP Auto Clicker – Auto Tap for Android?
OP Auto Clicker – Auto Tap is the official Android version of the popular OP Auto Clicker desktop tool. It is available for free on the Google Play Store and is compatible with Android 7.0 and above. Like its Windows counterpart, the Android app is completely free, contains no adverts and does not request any unnecessary permissions. It works by using Android’s Accessibility Service to simulate taps on your screen at locations and intervals you define.
The app supports two distinct modes: single target mode for automating a single tap point and multi targets mode for creating sequences of taps or swipes across multiple screen locations. This flexibility makes it useful for a wide range of tasks, from simple idle game automation to more complex multi step interactions.
Step 1 – Installing the App
The first step is to download and install the app from the Google Play Store. Here is how:
- Open the Google Play Store on your Android phone or tablet.
- Tap the search bar and type OP Auto Clicker or OP Auto Clicker Auto Tap.
- Locate the official app in the search results and tap on it.
- Tap Install and wait for the download to complete.
- Once installed, tap Open to launch the app for the first time.
The app is lightweight and downloads quickly on most connections. It is compatible with Android 7.0 and above, covering the vast majority of Android smartphones and tablets currently in use in the UK.
Step 2 – Granting Accessibility Service Permissions
When you open OP Auto Clicker for the first time on Android, the app will ask you to grant Accessibility Service permissions. This is an essential step without these permissions, the app cannot simulate taps on your screen. Here is how to grant them:
- When prompted, tap the button to open Accessibility Settings on your device.
- In your device’s Accessibility settings, locate OP Auto Clicker in the list of installed services.
- Tap on it and toggle the switch to enable it.
- A confirmation dialogue will appear explaining what the permission allows. Tap Allow or OK to confirm.
- Return to the OP Auto Clicker app it should now be fully active and ready to configure.
It is worth noting that the Accessibility Service permission is required solely for the auto tapping functionality to work. The app does not use this permission to collect data or monitor your activity. The developers have been transparent about this and the app requests no unnecessary permissions beyond what is needed to function.
Step 3 – Choosing Your Mode
Once permissions are granted, you will be presented with the main interface. The first decision to make is which clicking mode to use:
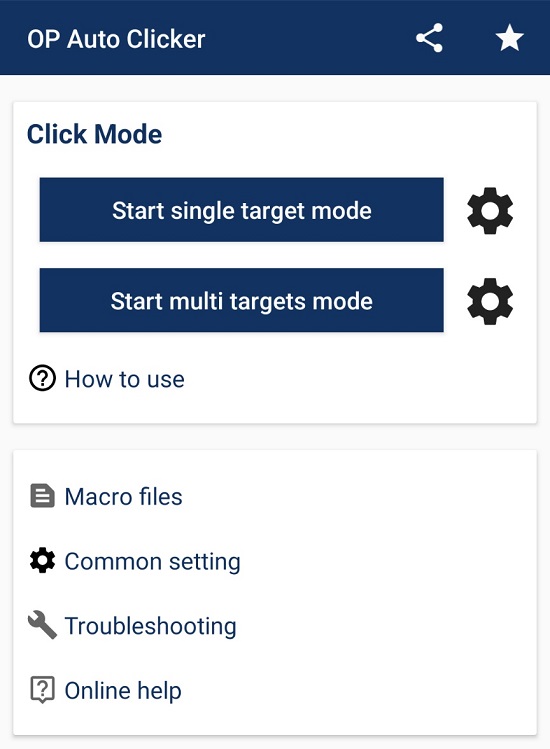
Single Target Mode
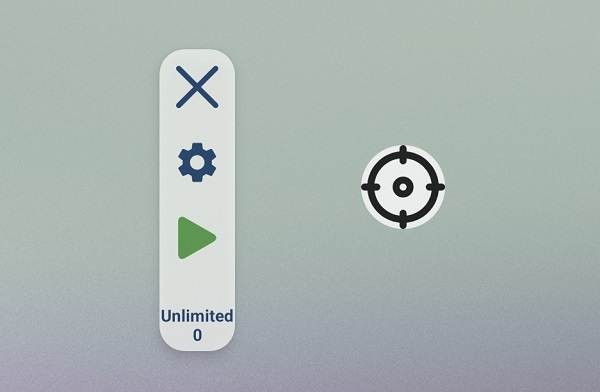
Single target mode allows you to set one specific point on your screen where the app will repeatedly tap. This is the simplest and most commonly used mode, ideal for tasks that involve a single repeated action such as tapping a button in a game, pressing a refresh icon or repeatedly confirming an action in an app. A targeting circle will appear on your screen, which you can drag to any location you choose.
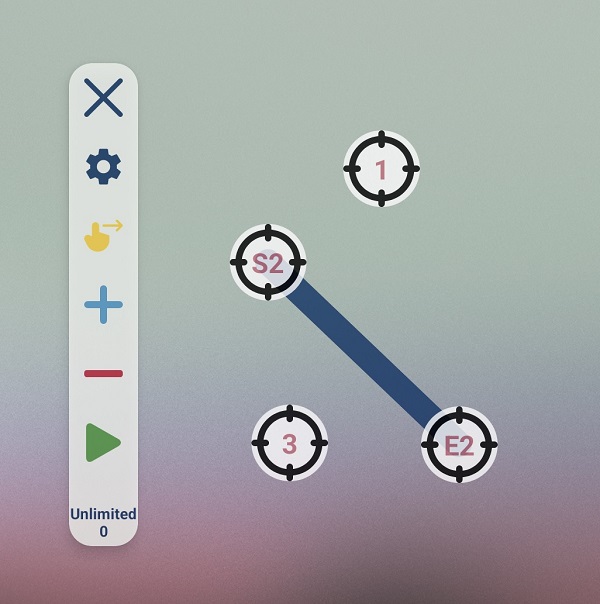
Multi Targets Mode
Multi targets mode lets you define multiple tap points or swipe actions across your screen, each with its own independent settings. This is useful for more complex workflows that require tapping several different locations in sequence. You can add targets by tapping the + button in the interface and remove them with the minus button on the menu bar. Each target can be individually configured and repositioned by tapping and dragging.
Step 4 – Configuring Your Settings
Whether you are using single target or multi targets mode, there are three key settings to configure for each tap point:
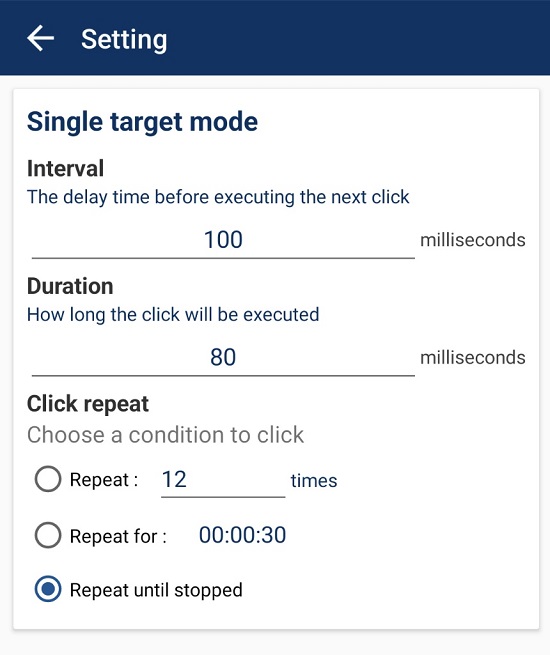
Interval
The interval setting controls how much time passes between each tap. This is measured in milliseconds. For example, setting the interval to 100 milliseconds means the app will tap once every tenth of a second. For slower, more deliberate taps for example, once per second set the interval to 1000 milliseconds. Adjust this to match the speed that the app or game you are automating can handle.
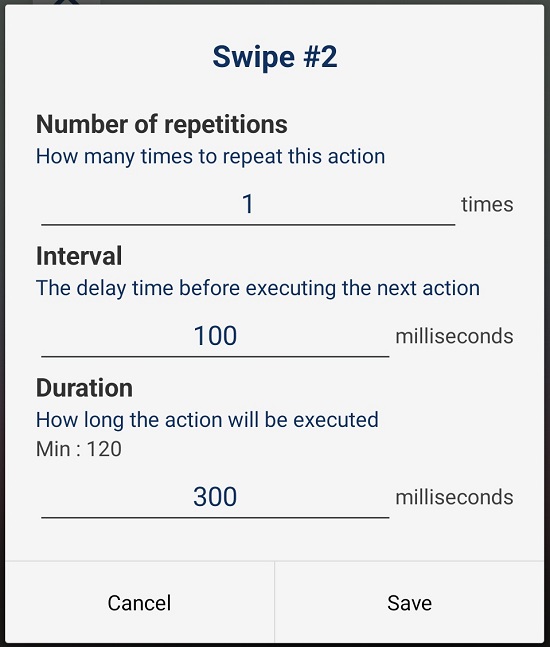
Duration
The duration setting controls how long each tap lasts. A short tap duration of around 80 milliseconds mimics a quick, natural finger tap. Longer durations can be used to simulate a press and hold action, which some apps and games require for certain interactions.
Click Repeat
The click repeat setting determines how many times the tap is performed. You have three options: set a specific number of repetitions such as 10 or 1,000 taps; set a time based duration in hours, minutes and seconds after which tapping will automatically stop; or select Repeat until stopped, which keeps tapping indefinitely until you manually press the Stop button. For most gaming and monitoring tasks, Repeat until stopped is the most convenient choice.
Step 5 – Starting and Stopping
Once you have configured your settings and positioned your tap targets, tap the Play button to begin the automated tapping session. The app will start firing taps at your chosen location or locations at your specified interval. To stop the session at any time, tap the Stop button. The app remains in the foreground as a floating overlay while running, allowing you to see what it is doing at all times.
Step 6 – Additional Features
Beyond the core functionality, OP Auto Clicker for Android includes a number of additional features worth knowing about:
- Macro saving: You can save your tap configurations as macro files, allowing you to quickly reload a specific setup without reconfiguring everything from scratch each time.
- Interface customisation: The app allows you to adjust the opacity and size of its floating interface, making it less intrusive when you need to see the screen behind it.
- Multi targets with swipes: In multi targets mode, you can configure swipe actions in addition to taps, giving you more control over complex automated interactions.